|
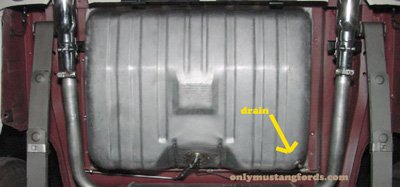
Mustang Gas Tank InstallationMustang Gas Tank Installation is easy and quick with the right safety precautions. Gas Tank Removal and Installation GuidelinesIf you are starting with an old gas tank that's been empty for a long time, that's great, but what if you need to replace a full or partially empty tank on an early or classic Mustang ? Follow these steps and you can make a quick and safe job of gas tank replacement. Tools and Materials: Procedure 1. Before you begin your Mustang gas tank installation, place the tub or oil change pan underneath the drain plug, which is located at the back of the gas tank (pointing towards the front of the car). Note: if you can't dislodge your drain plug, jump to step 3 and drain it after you've removed it from the chassis. 3. Removing the gas tank from your classic Mustang is easy, but if you still have fuel inside, you'll need to support it from below with blocks, wood or other materials. You could use a floor jack, but be very careful because if the fuel inside starts to slosh around, it can roll right off the jack which isn't a situation you want. 4. While it's not absolutely necessary to completely remove your fuel filler tube, it makes your Mustang gas tank installation much simpler. Separating the filler tube from the big rubber connector hose is a real pain, with an immoveable tube.
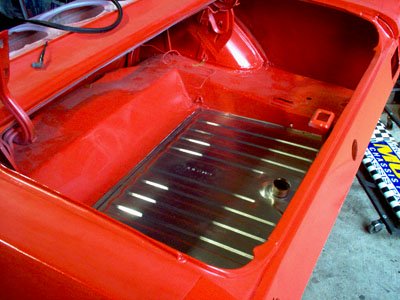
Using a screwdriver or nut driver remove the two metal clamps that secure the gas tank filler neck to the rubber tube. 6. Remove the other screws/bolts that hold the filler tube to the rear body panel and pull the filler tube out of the rubber connector through the hole in the rear light panel. 7. Remove the gas tank bolts which secure it to the trunk floor. Then carefully pry it away from the sealant strip underneath and lift it up and out of the trunk area. If you are dealing with a fairly full tank of gas, having a friend help can be a big bonus. Gas weights about 10 lbs per gallon, so even wrestling out a half filled 1965 Mustang gas tank means you have some 80 lbs to lift up and out of the trunk area! Mustang Gas Tank InstallationInstallation is the opposite of removal, but.... Wondering what that one strangely big bolt is and where it goes? Or maybe your restoration project car came without a gas tank and along with a new gas tank, you picked up a Mustang Gas Tank Installation kit, containing a bunch of shiny new chrome screws and a big black bolt and spring nut. And if you're wondering why they gave you that bolt, start looking for the bigger hole on the left hand side of the back of the tank. The bolt goes through the tank and not only helps hold the tank to the trunk floor, but also secures the driver's side of your rear valence to body bracket. Reattach the gas filler neck, gasket and gas cap. Check for leaks. Start you car and check for leaks again. If all checks out, you're good to go ! Gas Tank Restoration Learn how to restore your classic pony car's gas tank to like new condition in Part 11 1965 Mustang Gas Tank Restoration. (well maybe not new, but it will look good and won't leak) |


